
Crafting and eating are my pleasures in life and I hope that I can share them with you.
Sunday, 26 October 2025

Monday, 14 July 2025
Sunflower for Inspiration

Don't you just love it when the sunflowers come out?
This year they have been my inspiration for a quick and simple watercolour painting.
If you reply with the comment, please. I will add a video in the next couple of days.
Tuesday, 27 May 2025
Learn to paint a blue and purple hydrangea flower
Monday, 4 March 2024
Clothes peg your raspberries for a bumper crop
Friday, 10 June 2022
Thursday, 17 June 2021
How to Fix a gaping dress front
Monday, 4 January 2021
Salmon and Broccoli Quiche
Salmon and Broccoli Quiche

Pastry to line a 10 inch tin.
150 grams plain flour
1/2 teaspoon salt
90 grams very cold unsalted butter, cut into 1/2-inch cubes
Enough ice water to form a dough.
- Add flour, salt a to a food processor. Pulse 2 to 3 times until combined.Scatter butter cubes over flour and process until the butter is broken up. (There should be no uncoated butter). The mixture should be lumpy. You really don't want a fine breadcrumb mixture.Transfer to a medium bowl then sprinkle ice water over mixture — start with 3 tablespoons and add from there. Using your fingertips press the dough into itself. Add more water if necessary.Remove dough from bowl and place in a mound on a clean surface. Work the dough just enough to form a ball. Cut ball in half then form each half into discs. Wrap each disc with plastic wrap and refrigerate at least 1 hour, and up to 2 days.
- Roll out the pastry into an oblong fold into three. Roll out again. This will help to put layers in the dough and distribute the butter.
- Roll out and line a tart tin. I used a 10 inch tine with fairly deep sides. Put the pastry case in the freezer for about an hour. This will stop it from shrinking too much.
- Preheat the oven to about 190C. This very much depends on your oven. If yours cooks at a lower temperature feel free to adjust the cooking temperature.
- Once the pastry case is frozen put it on a flat surface. Place the piece of foil over it, then press it down over the base and up the sides of the pastry. Turn the edge of foil inwards and crumple it against the sides to create a support that will hold the pastry in place whilst it cooks. I usually add baking beans.
- Put the pastry case onto the pre-heated tray in the oven and bake for 15 minutes then remove the pastry case from the oven and ease the sides of the foil inwards and carefully lift it away from the pastry case Brush the base and sides all over with beaten egg (use a little from the filling), which will provide a sort of moisture proof coating so that the pastry stays beautifully crisp even after the filling has gone in. Now return the pastry case to the oven for 7-8 minutes.
- Remove from the oven and leave to cool.
- Turn the oven down to 180C.
For the filling
4 fillets of salmon
4 eggs
1 head of broccoli steamed until al dente. Break the broccoli up a little.
100ml of double cream
150g cheddar grated
salt and pepper.
Poach the salmon in about an inch of seasoned water. It will only take abour 5 minutes to turn opaque. Leave to cool. Skin and break up into large chunks. Set aside
In another bowl beat the eggs with some salt and pepper and the cream to make a smooth custard base.
Cover the pastry base with salmon.
Top with broekn up broccoli
Top with the grated cheese.
Pour over the custard mix and return to the oven.
It should cook in abour 20 minutes but this is only approximate. It's ready when it starts to brown on top but there is still a little bit of a jiggle in the middle.
Sunday, 20 December 2020
Mince pies are a Christmas treat that you really shouldn't miss out on.
Christmas is almost with us and here in the UK one of the traditional treats that most people tuck into is the much loved mince pie. Not made with mince meat but with a delicious mix of dried and fresh fruit. The fresh fruit comes in the form of apples and lemons while the dried comes from currants, raisins, sultanas etc. All will be revealed in the recipe. I use Delia Smith's recipe for my mince meat but I do make a couple of tweaks. I don't like mince meat to be too sweet so I up the lemon juice to give it a sharper edge. I also peel the apples. Who wants to eat thought apple skins. Not me for sure.

You will need to start by making your mince meat. you can do this well in advance or, if you are short of time, buy a large jar.
The pastry used for these pies is usually shortcrust but I prefer a richer crumbly pastry so I make a pasta frolla, which is an Italian version of pat sucre. It really is yummy so please give it a go.
Working with about a third of the dough at a time cut out rounds that will fit your pie tin. Remember to keep enough pastry back to cut out the lids.
Fill each pie with mince meat and top with a lid. brush with milk and cook at approx 180C until a golden brown. Remove from the oven and cool a little before removing from the tin. Dust with powdered sugar and enjoy warm with the breath of the oven still on them.

Tuesday, 6 October 2020
Felt Christmas Trees
It’s the beginning of October and as all good crafter know, Christmas preparations need to be well underway. In the last few years I have concentrated on making beautifully decorated felt hearts to hang in my Christmas home. I have not walked away from my beautiful hearts but I have just bought a new die to cut out trees that can be easily stitched into Christmas decorations.
What I aim to do is to design a set of trees that compliment each other. These die cur felt trees are currently available on my eBay shop. I have lots of colours so goodness knows what I will come up with.

For this first tree I decides to use the scarlet wool blend felt. If you like this colour combination I have the ready cut tree shapes here on my ebay shop. It's current this month and next but I will remove it shortly so don't delay if you want to buy some

https://www.ebay.co.uk/itm/164417738333
As we are in a lockdown area and I have an almost enforced plenty of time on my hands, I've decided to play around with these tree designs and try out anything that comes to mind.
So, here is another using the light stone felt and the same colour decorations as the scarlet.

Now what about a blue scandi themed tree?
See you all soon,
Wednesday, 20 February 2019
How to make chiffon ribbon flowers with stamens.
I've decided to make a few very quick and very easy videos on making ribbon flowers. Please watch the video until the end and add a comment on Youtube rather than on the blog.
Thursday, 7 February 2019
Easy Flower Drawing
If you want to buy the pens then they are for sale here on ebay:
https://www.ebay.co.uk/itm/163371548355
Wednesday, 6 February 2019
Beautiful Puffy Vintage Style Ribbon Roses
So, with many retakes and a fight with Photoshop Premier under my belt I finally got theirs baby up and running on Youtube.
In fact I published it 3 times. How did I do that?
Watch and create.
Sunday, 24 June 2018
Have Apricots, Make Jam
There is even a speechless tester at the end.
Enjoy.
Friday, 22 June 2018
Blue two tone flower - Tutorial
Just had to make this video tutorial as I worked out how to replicate the flowers that I draw with Kuretake pens.
If only I could work out how to put the video further down the page I would be really happy. I am not too bad with technology but things like this really annoy me. GRRRR!
Thursday, 17 May 2018
Delicious Kefir Berry Shake

Saturday, 5 May 2018
Panzanella, A Taste of Italian Sunshine


- 1 red onion that has been soaked in wine vinegar. This will soften it and make it less harsh.
- 3 or 4 large ripe tomatoes. I used the cuore di bue which are the size of my hand. 3 of these will weigh about a kg. So aim for that.
- 3 small European type cucumber. These will need to be peeled as they have a spiky skin. Failing these use 1 hot house cucumber.
- a large handful of stale bread cut into chunks.
- a bunch of basil torn up.
- olive oil
- wine vinegar
Sunday, 8 April 2018
Pearls never go out of fashion.


Wednesday, 14 March 2018
Amethyst beaded necklace

I have some beautiful large silverlined glass beads. They are lentil shaped which means that they are discs with a dome shape in the middle. I also have the Silver Colour Scarf Tube Pendant x 2, which I used to hang the pendant.
Now, I'm not pretending that this was quick to make as it was not. The rope will take a couple of evenings but, when that's done, the rest is a breeze and the effect is stunning.
If you are interested I can make up a kit for you at the cost of £10. This will include everything except the fireline and needle.
Monday, 12 March 2018
Book Review: How to Lose Weight Well
Some of you that follow this blog will know that from time to time I review a book. Today's victim is
How to Lose Weight Well by Xand van Tulleken
You may well have seen the highly amusing television programme that was broadcast last month. Just about everyone lost weight on the variety of diets that they tried. This book is not about that, it is about the diet that Van Tulleken has devised with the help of a nutritionalist.
The preamble to the book is well written and it is easy to understand his reasoning behind weight loss and his own battle with being over weight.
The recipes that he publishes in his book are interesting and tasty with a big emphasis on vegetables. This is perfect for me as I tend to eat more veg than fruit. So far so good.
What I didn't like so much was the choice of three diet plans that are on offer in the book. Basically it is the same amount of food split between the three main meals of the day. You either eat three meals, two meals or one meal. The amount of food doesn't change just the portions at each meal time.
If you want a diet that will see you dropping fat at a fast rate then this is perfect for you. I only want to lose three kilograms so I can't say that it is for me. I will use some of the recipes though. The aubergine recipe is fantastic.
Sunday, 11 March 2018
Make your own non dissolving dusting sugar
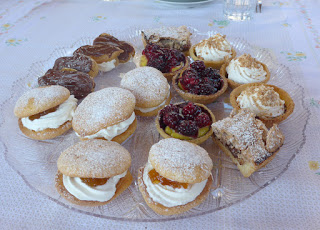
How does this happen? Here's the science for you.
The sugar particles are coated in the vegetable oil so the moisture can't get at them. It's as simple as that. The use of dextrose instead of sucrose also helps as it is a finer and less sweet sugar. That's why those sugar coated doughnuts don't taste overly sweet.
Now we reach the second problem. This dusting sugar is not widely available in the UK. It can be bought from bakery supplies if they will sell it to you but it comes in 12.5kg bags. Far too much for the home baker to use.
So what is there to do?
The solution is fairly simple. Instead of using the above list of ingredients you can coat the sugar in melted cocoa butter. To give the sugar a delicate flavour of vanilla use some vanilla extract in the melted cocoa butter.
You will need a food processor to make the dusting sugar, but at a push you could do it with your finger tips. It is less messy and more efficient in the food processor.

To make your dusting sugar:
10g cocoa butter, melted.
1 teaspoon vanilla extract
50g dextrose
50g icing sugar
If you don't have dextrose and it is fairly easy to get from Amazon. See this link then you can use all icing sugar. It will be sweet.
Melt the cocoa butter. I did this by putting the cocoa butter in a small bowl and placing it in a larger dish that contained boiling water. it didn't seem to like the microwave method of melting chocolate. It will only take a couple of minuted to melt. Add the vanilla to the melted butter.
Put the dextrose and sugar mixture into the bowl of the food processor and switch on. Pour the cocoa butter in through the feeding tube. It will mix into the sugar. If any of the butter collects on the base of the bowl then give it a stir and pulse again. Repeat this until all of the cocoa butter has been absorbed. It will not be pure white as the vanilla will colour it slightly. You won't notice this when it's on the cake.
Your dusting sugar is now ready. Store in an air tight jar until ready to use.